Thursday, September 28, 2006

Victorian Christmas Trimming Ideas

Victorian Christmas Trimmings to MakeThe Victorians were really into Christmas, which isn?t really surprising because the Victorians were very religious, and Christmas is a religious festival. However, most Victorians didn?t have lots of money to spend on Christmas trimmings like people do today, instead they found inexpensive ways to decorate their homes. They would make garlands and wreaths from evergreens such as ivy and yew; sprigs of holly would be used because their bright scarlet berries would to add a splash of colour.

The Victorians also made Christmas decorations such as popcorn tinsel, which was popcorn threaded on to a piece of thread, in much the same way that children thread up pasta today.

Re-cycling bits of paper and card was common practise when making Christmas trimmings. Victorian homes would have been decorated with paper chains and paper lanterns, which were quick, cheap and easy to make.

How to make paper chains?
First you need to cut strips of paper. The longer and wider the strips, the chunkier your paper chain will be. To make paper chains to hang from the ceiling, use A4 sized paper, and cut the strips width ways across the paper. Make each strip about 4 cm wide.

Using different coloured sheets of paper you can make a lovely multicoloured chain. If you do not have coloured paper you could use white paper that you have scribbled on. The scribble will give it colour and make it more interesting.

Take one of the strips and curl it round so that the two ends meet and slightly overlap. Staple or selotape the ends together to hold the link shape you have created.

With the second strip of paper, push it through the first link and then curl the strip around so that the two ends of the strip slightly overlap. The first link should hang from the second link. Again staple or selotape into position.

Continue adding links to the last link created in this way until your paper chain is of a desired length.

They make great trimmings for hanging from ceilings and for decorating hallways.

Of course, you can use any type of paper to make a paper chain. Metallic paper is really festive. You could use old Christmas cards. Cut thin strips width ways across the picture of the Christmas card to create delicate paper chains to drape on the branches of a Christmas tree.

How to make paper lanterns?
You will need a rectangle of thin card or stiff paper. A4 size makes a nice sized lantern to hang from a ceiling or to sit on a mantelpiece.

Cut a thin strip, about 1.5cm wide across the paper width ways. Keep this strip to one side for later, it will become the lanterns handle.

With the rest of the sheet laying landscape, fold the top to meet the bottom edge, press the fold firmly. With scissors, make cuts along the folded edge. Open out the card and curve it round so that the two short sides meet and slightly overlap. Staple or selotape these two edges together.

Give your lantern a little squeeze so that it creates ?< >? shape.

Now take a piece of brightly coloured contrasting paper. It needs to be about the same height as the slightly squashed lantern. Roll up the paper into a tube and insert into the lantern. Allow the roll of paper to unravel to fit snugly inside the lantern, glue or staple into place. The slits cut into the lantern let some of the coloured paper peep through, it gives the lantern the appearance of being lit.

Using the thin strip of card that was cut from the lantern at the beginning, make a handle by stapling or selotaping either end of the strip to the top of the lantern on opposite sides.

Paper lanterns can be made to any size. You can make small ones to hang from the Christmas tree or to hang from the paper chains. You could make them from old Christmas cards.

Why not have a go at making some Victorian style Christmas decorations, you could make your house or your classroom look like it had gone back in time.


For more home made Christmas decoration ideas visit SantasPostbag.co.uk

Write an email to your child from Santa Here - It's FREE!!

How to Make Christmas Skittles

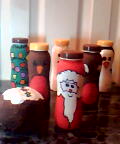
Have you heard people say that toddlers always prefer the box and the rubbish rather than the present inside? Fun and funky kid’s skittles and Christmas pudding bowling ball and all made from rubbish! The ideal Christmas present for younger brothers and sisters. Best of all each skittle is made from a Yazoo milkshake bottle, and somebody needs to drink the delicious milkshake drink!

You will need a pack of 6 mini Yazoo milkshakes. Empty the bottles and rinse the bottles out and leave them to drain until they are completely dry.

Each bottle now needs a thin layer of paper mache. This makes the bottles easier to paint and it covers the ridges on the bottle. Rip up newspapers into small squares. Mix some PVA glue with two parts water and with a paintbrush, stick the newspaper pieces to the bottles so that they are completely covered. Allow to dry over night.

Now you can paint your bottles in festive designs such as, a penguin from Lapland, a snowman, a Christmas tree, a robin, Rudolf and Father Christmas.

To make the bowling ball, scrunch up two sheets of newspaper into a ball and add some selotape so that it keeps its ball like shape. Then apply 3 or 4 layers of paper mache. Allow to dry overnight.

Paint the bowling ball to look like a Christmas pudding with cream drizzled over it and with a sprig of holly on the top.

When all the paint is dry you can test it out. Set the skittles out to form a triangle. 3 skittles in the back row, 2 skittles in the middle row and one skittle at the front. Try to knock all the skittles over with the Christmas pudding.

To make the game harder you can put some sand inside each bottle to weight it slightly.

You could also write points on the bottom of each skittle and make a point scoring system.

You could make a larger set of skittles by using the larger bottles of Yazoo milkshake, and then you would have more milkshake to guzzle!

Click Here for individual images of each Christmas skittle.

More fun Christmas stuff Here


Saturday, September 23, 2006

Cardboard Nativity Scene

The nativity and the birth of Jesus Christ are the fundamental part of Christmas. It?s the story of Mary and Joseph travelling to Bethlehem to be counted for the census. Poor Mary was heavily pregnant and had to ride on a donkey. When they got to Bethlehem all the inns were full, and Mary and Joseph spent the night in a stable, where Mary gave birth to Jesus, the Son of God. Angels, shepherds and three wise men from the east came to visit Jesus, who was lying in a manger. This is the traditional image we have of the nativity scene.

To make a cardboard nativity scene al you need is... Loo roll tubes or other tubes, scarps of paper and coloured card, glue, scissors, felt tip pens, cotton wool, and a few sequins for decoration.

To make the figures...
The loo roll tubes for the main body of the figure. Wrap coloured paper around your tube so that it completely covers one half of the tube. This becomes the body and the bare tube becomes the figure?s head.

Cut out two small rectangles from some card, these become the arms. Stick them into place n the figure?s body, towards the top of the coloured paper. Stick a 'D' shaped piece of flesh coloured card on the end of the arm to form a hand.

Draw on the figure?s face with felt tip pens. You can also draw on clothing details or patterns.

Extras...
The shepherd holds a crook, its a hooked tool which shepherds use to put around a sheep's neck as a sort of temporary lead to guide the sheep where the shepherd wants it to go. Cut a long hooked shape tool from card and stick it standing upright in the shepherds hand as though he was holding it.

The three wise men wear crowns or a turban. Cut these out of coloured paper and wrap them around the top of the wise men's heads. Decorate them with sequins to make them look jewel encrusted.

Joseph holds a lantern. Cut a long stick with a 'V' shape at the top. Stick this into Joseph's hand so that it is standing upright. This pole is to suspend the lantern from.

To make the lantern, take a small, rectangle piece of card and fold it in half so that the top and bottom of the lantern are together. Cut slits along the folded edge. Open up the card and now curve it round so that the two side edges meet and slightly overlap stick these two side edges together. When the glue has dried off a little, give the lantern a little squeeze so that the lantern forms '< >' Shape. Insert a roll of flame coloured paper into the lantern, glue and trim so that it fits snugly into place. This makes the lantern glow as though it were lit. Stick on some threat or a thin strip of card so that the lantern can be hung from Joseph's pole.

Sheep are made by covering a loo roll tube in cotton wool. Cut out a face shape from card to stick on one end of the tube. Cotton buds form the sheep's legs and feet. Cut a cotton bud in half to form two legs, glue all the legs into position.

Jesus is made from a rolled up piece of card, with coloured paper covering his body.

The manger is made from a loo roll tube. Cut the tube in half lengthways to form two guttering looking parts. Cut one into leg type shapes on each side and stick the two half tubes together, back to back.

Arrange all the figures on a table to recreate the nativity scene.

You could also attach a thread from your figures and hang them from the Christmas tree.


See nativity images at Santas Postbag

Write Santa a letter telling him what you would like for Christmas, he always replies http://www.santaspostbag.co.uk/write-letter-to-santa.html

Tuesday, September 19, 2006

Home-made Stained Glass Window Christmas Treats

These Christmas treats are brilliant festive fun. They look really cool hanging from the Christmas tree with the fairy lights shinning through them, and they taste great too! They are great fun to make, and make the kitchen smell like a sweet factory - Yummy.

What you will need...

1 packet of frozen pastry. Allow to fully defrost, see the back of the packet for instructions.
1 Bag of clear coloured boiled sweets.
Cardboard


What to do...
First, whilst the pastry is defrosting you can be designing and making stencils. You could try a star, a Christmas stocking, a Christmas tree, a bell, a sprig of holly, anything festive and with a Christmas theme is great. The stencils need to be simple and they need to have hole inside them. If there is too much detail they might break whilst you are making them. Make sure as well that your stencil is an appropriate size to hang on your Christmas tree. Once you have cut out your Christmas stencil leave it on one side until later.

Set the oven to 180°C/350°F/Gas Mark 4

Line a backing sheet with greaseproof paper

Lightly dust the surface with flour to prevent the pastry sticking and roll out the pastry thinly with a rolling pin. Lie your stencil on the top of the pastry and carefully cut round it with a knife. The knife doesn’t have to be very sharp, pastry isn't hard to cut.

On the top of each shape you need to make a small hole to thread some ribbon through later so that you can hang the treat on the Christmas tree. Use the handle of a teaspoon to just push into the pastry to make a small hole.

Place your cut out shapes on the paper lined baking tray, so that they don't touch.

Roll your pastry trimmings up into a ball and re-roll the pastry. Cut out as many Christmas shapes as you can, and keep re-rolling the pastry trimmings until all the pastry has been used.

Bake the Christmas shapes in the oven for 8 - 10 minutes.

In the mean time...
Rinse the rolling pin because you’re in for a smashing time! Place a wrapped boiled sweet onto a chopping board and tap it with the rolling pin to smash it. Once broken, unwrap the sweet and collect the broken sweet pieces on saucers, keeping all the colours separated. All the sweets need to be broken up.

Keep an eye on the time.

Take the pastry shapes out of the oven. Add different coloured crumbs of sweets to each hole in the pastry shapes. Colours in the same hole will merge. Experiment and see what designs you can make. Do be careful because the baking tray and the pastry will be hot.

Put the treats back in the oven for 2 minutes to let the sweets melt.

Take the treats out of the oven and leave to cool. Peel the treats off the paper and serve or thread ribbon or string through and hang them from your Christmas tree.

More Fun stuff to make...


SantasPostbag.co.uk

Monday, September 18, 2006

Paper Christmas Angles

These cute paper angles don?t take many minutes to make. Just print out the plant of two angles HERE

Colour in the two angles in any colour you wish.

Now cut out the angles.

Cut along the dotted lines. This creates the angles wings and arms.

Curve the angle?s skirt round and use the tab at the back to glue you angle together.

Bring the angles arms down from the ?above head? position and create folds at the angles shoulders.

The angle?s wings should stand proudly out behind the angle.

Angles can be stood up on shelves or on other surfaces, or suspended from the Christmas tree with a piece of thread selotaped to the back of the angle?s head. Simple, easy to make and attractive angle decorations, print some off and have a go.

Paper angles also make lovely dinner place names for Christmas dinner seating pans. Just write the name of the guest on the angle?s skirt and glue a small piece of silver tinsel to the back of the angels head for a halo effect and to add a bit of sparkle.

Printable Paper Christmas Angles Here

Click Here for more Christmas Fun Stuff


How to Make Decorative Tea-light Candleholders

Anyone who enjoys candlelight will love these little tea-light candleholders. Quick and simple to make and very attractive.

To make a tea-light candleholder you will need...
Shallow jars. Knorr - 'Stir it up' cooking sauce jars are ideal for this. Make sure your jars are clean and dry.
Metallic spray paint.
No nails glue.
Glass Stones.

Spray paint your jars with a thin layer of metallic paint. Make sure that you read the back of the paint can before you begin. When using spray paint it is important to make sure that you use it in a well-ventilated room and that you are not near any naked flames.

Paint the outside and the inside of the jars and then leave them somewhere to dry. You may wish to apply two coats of paint for good coverage.

Use ?No Nails? glue to stick on glass stones evenly around the outside of the jar. Be careful not to use too much glue because if it does splurge out onto the jar it will spoil the candle holders appearance. No nails glue dries white.

Once the glue dries your ready to put the tea-light candle inside.

You could use other things to decorate your candleholder. Glue on pasta shells or string before spray painting. Try substituting glass stones for seashells, sequins or buttons. Do make sure that any decoration that you apply is on the lower part of the jar. Never allow anything to cross the top of the jar because this would be a fire hazard.

Let your imagination go wild and create some beautiful tea-light candle holders for your friends and family this Christmas.

More Christmas Gift Ideas to Make...

Have Santa Write your child a email this Christmas time. Click here for this FREE service


Friday, September 15, 2006

Dressing up as Santa Claus? Tips and Pointers

Santa Costume Are you thinking of dressing up as Santa Claus this wintertime? Maybe you have been invited to be Santa for the local school Christmas fair, or maybe you're off to a fancy dress party. Maybe you just want to do something special for your children this Christmas time by dressing up as Father Christmas and sneaking into their bedrooms this Christmas Eve, to deliberately be seen and to deliver them a special gift. Don't get caught though, because they'll never believe in Santa Claus again.

When buying your Santa costume there are some things that you need to consider to pass yourself off as an authentic Santa Claus.

Santa is rather a plump fellow with a 'little round belly, that shook when he laughed like a bowl full of jelly' - 'Twas The Night Before Christmas. Father Christmas isn't a heavy drinker, he doesn't have a beer belly. Obviously he is plump because he eats all those mince pies on Christmas Eve. Anyway, my point is that unless you also over do it on the mince pies, you're going to have to make yourself plump. The easiest way to do this is to sew tape ties on to the top of a cushion, so that you can wear it around your waist like an apron. You may need to give your new belly a bit of manual assistance to wobble like jelly when you laugh. When buying or renting your costume, make sure that you buy a size that will accommodate your new figure.

Santa is also known for his rosy cheeks 'His cheeks were like roses, his nose like a cherry' - 'Twas The Night Before Christmas. Of course being out in the night air so long on Christmas Eve, it's no wonder that his cheeks are rosy. Make your cheeks and nose rosy by applying some pink blusher. Make a pink circle on each cheek and a smaller one on the tip of your nose. Don't worry if you feel a little foolish, it will look great when you have the full costume on.

Santa's boots are very individual, you can't get away with just wearing black wellingtons. Santa rides on a sleigh, he doesn't wear boots to keep his feet dry, he wears them to keep warm. Your boots need to appear to be fur lined and they need to have a fleecy turnover at the top of the boot.

Finally, you need to perfect your "Ho, Ho, Ho." It needs to be in a low pitch and needs to sound happy. Santa's trademark "Ho, Ho, Ho" isn't just Santa's chuckle for when he finds something amusing, but he also uses it when he makes a mistake. So if he leaves sooty foot prints on the carpet "Ho, Ho, Ho,." If he knocks your Christmas tree over "Ho, Ho, Ho" and with cold numb fingers, Santa is often clumsy.

If you are dressing up as Christmas time, please make sure that you abide by this advice and do not blemish Santa's reputation, but do have a splendid time. Laugh lots, and hover around the mince pies!


More Christmas Info...

Thursday, September 14, 2006

How to Make a Starry Night Festive Plant Pot

Home-made Christmas presents make lovely gifts. They are special because the person who makes the gift puts a lot of time and thought into the present. This Christmas plant pot present is stylish, funky, and easy to make and celebrates the religious element of Christmas time, the birth of Jesus Christ.

All you need is...
A terracotta plant pot, of any size you choose. Some black gloss paint or another night sky colour. Gloss or silk emulsion paint is great. A mini tester pot would be ideal or leftovers from the shed.
A small amount of metallic or white paint.
No Nails glue.
A selection of coloured glass stones.

Firstly, paint your plant pot in the night sky coloured paint. You may wish to apply two coats to get a nice finish. Use the paint in accordance with the directions on the paint tin. Only continue once the paint is completely dry.

Using metallic or white gloss paint, paint a star onto the plant pot. The star should have four points or arms, and it should look a bit like a crucifix. This is the basis of the focal point of the plant pot. This is the star that shone down upon the stable at the nativity, and which led the three wise men and the shepherds to the place where Jesus was born.

Allow the star to dry.

Using no nails glue, stick on a glass stone at the centre of the painted star. Now stick other glass stones on the pot to give the appearance of a starry sky. You can sick on actual star formations, the plough or the great bear or any others that you know. Don't forget to decorate the back of your plant pot too.

This festive plant pot would make a super Christmas present just as it is, or you could plant it up with some springtime bulbs.

More Christmas Gift Ideas...

Wednesday, September 13, 2006

Pin the Nose on Rudolf Christmas Party Game

This is a simple children's Christmas party game. I deal for young children due to the simple rules and it’s all round good fun.

Preparing the game
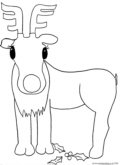
Draw a large reindeer to pin on the wall or to stick to a table. Try not to leave indented drawing lines on the paper, we don't want any cheating!

Make a red nose and cut it out. Or you could paint a Ping-Pong ball red and use that for Rudolf's nose. Stick some blue tack on the back of the nose so that it easily sticks to the large reindeer drawing.

How to play
Blindfold your first contestant with a scarf. Give them the nose and then turn them round 3 times and then guide them to the reindeer picture.

The contestant must then stick the nose on where they think Rudolf's nose should be in the picture whilst still blindfolded.

Once the nose is stuck in place, the contestant can remove their blindfold to see the result. The referee should mark the spot with a small 'x' and then label it with the contestant's name. Blindfold the next contestant to repeat the process.

Once everyone has taken a turn, the winner is the contestant whose 'x' is closest to the correct place for Rudolf's bright red nose.

Download a printable Rudolf at SantasPostbag.co.uk

Popup Santa – Kids Christmas Make

Popup Santa Claus Kids MakeWatch as Santa Claus pops out of the chimney pot. But don't get him stuck because if he catches you he won't bring you any Christmas presents.

To make a popup Santa you will need - 2 loo-roll tubes. One needs to be slightly bigger than the other, so that one can easily slide up and down inside the other tube.

The larger tube is the chimney pot. Cover this tube in paper or paint to look like a chimney pot.

The smaller tube is Father Christmas. Stick on paper or paint this tube to look like Santa Claus. Give him a long white beard and a bright red coat.

Stick on a strip of red paper around the top of the tube so that the paper over hangs the tube. Scrunch the top edge of the paper to form Santa's hat. Stick a cotton wool ball on the top to finish it off. The glue helps to keep the scrunched up edge nicely in place.

Cut out two thin strips of card. Stick them on the side of Santa to make his arms. The turn over you make to stick on the arms acts as a hinge later. Santa’s arms will pop out of the chimney as Santa appears.

When Santa is complete and the glue or paint is dry, cover Santa in sticky clear book protector or clear selotape. This reduces friction as Santa slips up and down inside the chimney.

Put Santa inside the chimney. Put your fingers up inside the chimney to mover Santa up and down so that he appears to POP out of the chimney.

Popup Santa is great for 'doing' the actions to the song 'When Santa got stuck up the chimney'

When Santa got stuck up the chimney,
He began to shout,
“You girls and boys won’t get any toys,
If you don’t pull me out!
My beard is black,
There’s soot in my sack,
My nose is tickling too”
When Santa go stuck up the chimney,
Achoo Achoo Achoo!

More fun Christmas makes

Monday, September 04, 2006

How to Make a Festive Snowflake Plant Pot

Homemade Snowflake Plant Pot

How to make an inexpensive and festive plant pots, Ideal for adding additional festive cheer to your Christmas decorations. Christmas plant pots also make fantastic Christmas presents for any plant lover. They can be used inside or out. Super for potting springtime bulbs, or a little Christmas tree or dwarf conifer.

You will need...
A terracotta plant pot in whatever size you wish.
A base colour paint. Gloss or silk emulsion is great. Use up leftovers from the shed, they have just come in handy.
Metallic spray paint, scissors, selotape, paper, newspaper and paintbrushes.

Before you begin you need to cover your work area in newspapers to that you don't spoil any furniture with paint.

Take your plant pot and apply two coats of the base coloured paint. This will take a couple of days to complete because of drying times. Complete as directed on the back of the paint tin. Only continue when the paint is completely dry.

To add a snowflake design you need to make paper snowflakes. Take a square piece of paper and fold it in half to make two triangles. Then fold in half again, and fold one more time. Always fold the paper in the same direction, and keep the centre of the piece of paper at the tip of the folded triangle. Now using the scissors cut interesting shapes along the folds, along the top and snip the point off your folded triangle. Don't cut too much paper away so that it all drops to bits. Unfold the paper to reveal a beautiful snowflake. Make several different snowflakes, you can also make them in varying sizes if you wish.

With small amounts of selotape or blue-tac, tack the snowflakes to the plant pots. The snowflakes mask off parts of the pot. Any part of the pot masked off will remain the base colour.

Once you’re happy with the snowflakes, you're ready for the metallic paint. It is important that you use spray paint in a well-ventilated room and that there are now naked flames present. Read the paint ca for full instructions.

Spray your plant pot and snowflakes with a thin coat of paint. Keep the paint tin moving at all times. You need to avoid a build up of paint because it will run and spoil your design. You can always spray another coat later.

When the paint is dry, carefully peal off the snowflakes to reveal a beautiful frosty snowflake theme plant pot, great to keep for your self or to give away as a gift.

More Christmas Fun Stuff!

Sunday, September 03, 2006

Card Decoration Balls - Home made Christmas Trimmings

Christmas Card BallsHome-made card balls are attractive and so simple to make. They can be made to any size. Small ones for the Christmas tree or Large ones to decorate a room, they make great alternative to balloons. You can imagine thrifty Victorians making these card balls to decorate their house at Christmas time.

To begin with you will need a triangle and a circle card board template. You can make these from an old cereal box. The triangle needs to be an equilateral triangle.

You will need cardboard, a pair of compass and a ruler to make your triangle. First draw a straight horizontal line to form the base of the triangle. Open the compass so that the point and the pencil ate the same distance apart as the length of the ruled line. Then with the pint of the ruler on one end of the ruled line, lightly draw a curve with the compass. The do the same thing with the point of the compass on the other end of the ruled line. Where the two curves cross is the to point of the triangle. Rule lines from this point to the base of the triangle. Cut the triangle out and place to one side.

To make the circle template, use the compass to draw a circle a few millimetres larger than the than the triangle.

Now using thin coloured card or old Christmas cards, you need to draw and cut out 20 circles using your template so that they are all the same size. You could use the same coloured card, and then paint the ball once it is complete. You could make a photo ball using photos of all the family stuck to pieces of cardboard.

The circles now need to be folded into shape ready for construction. Lay a card circle face up on the table. Place your triangle template on top and hold it down firmly whilst you fold up the sides of your circle around the triangle template, to form a triangle inside the circle. It's a bit like wrapping up presents. Unwrap the triangle, and move on to the next circle. All 20 circles need triangle folds fling inside them.

To construct the ball...
To attach the folded card circles together simply lift the circle sides on two pieces so that it stands up and forms a ridge, the folded triangle side butt up to one another. The ridge is where you staple to join the two triangles. Apply more staples for larger balls if you wish to. Staples are also easily removed if you make a mistake.

Join five triangles together so that it forms a dome shape. Make two more domes, each with five triangles joined together. Then join the 3 domes together.

You may find yourself getting lost at this stage, and you will probably be thinking that it will never work. But it does, just carry on and follow these rules.

Check around your ball. Each triangle has to be part of a dome where five triangles meet. Add the remaining triangles to the places on your ball where there are too few triangles. Eventually you will have used up all of the triangles and your ball will be complete.

Tuck some ribbon for hanging between two joining triangles at the point you would like to be the top of the ball.

Finishing touches...
You could splatter your ball with coloured paint to create a funky design.

You could apply glue to all the stapled ridges and sprinkle on some glitter to really jazz it up.

You could staple tinsel along the ridges of a large ball.

You could make a Christmas room decoration centrepiece mobile. Small card balls suspended at varying lengths from one large card ball, with a cut out of Santa hanging from the centre.

When your really good at making card balls, substitute staples for glue and make a little gift box for sweets, earrings and other trinkets.

These card balls are brilliant fun. Everyone will be amazed at the cleverness of it. Best of all, it's re-cycling at it festive, using old Christmas cards, used cereal boxes, last years odds and ends of gift wrap, tinsel and glitter.


More Christmas makes Here