Monday, October 23, 2006

Scented Stuffed Animals

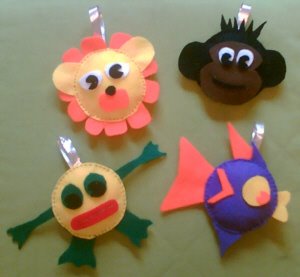
We are not talking taxidermy, we are talking lavender or scented bags in the shape of animals. These scented animals are very easy to make and are great to hang in the wardrobe, push into drawers, hang in the car, you can put them anywhere that you want to create a nice fragrance.

All you need is...
Felt in assorted shades, PVA glue, thread, stuffing, lavender flowers, potpourri, or scented oils for fragrance.

The basis for any of the scented stuffed animals is a circle of fabric. Use a mug to draw around onto a piece of paper to create a pattern piece. Using the pattern cut out two circles of felt. This forms the animal’s head or body, and also makes up the main part of the bag.

Extras can be slipped between these two circles. Extras may be limbs, ears, horns, tails, or hair. Also tuck a loop of ribbon between the two circles to be used for hanging the scented bag up. Pin the ribbon and the extras into place so that the pins point outwards like the spokes of a bike wheel. This makes it easier to sew.

Sew a row of small stitches around the edge of the circle, making sure that the needle passes through all the layers of fabric. Leave an opening at some point on the circle, preferably where there aren't any extras hanging out. This hole is to stuff the animal.

If you have access to a lavender bush, you can collect all the dead lavender flowers and leave them upside down in a paper bag to dry. You can use these dries flowers to scent your animal bag. Lightly stuff the animal with packing and add some dried lavender flowers. Similarly you can scent the animal with potpourri.

If you are using scented oils to fragrance the animal, drop the oil essence onto the packing before stuffing the animal. The oil can discolour fabric, so adding it to the stuffing means that it won’t spoil the finish of the scented bag.

Lightly stuff the animal and then close up the opening.

To finish, cut out eyes and other features from felt and glue them into place. Animal’s eyes look really good if you cut a triangle out from the pupil. It gives the animal character.

These animals are delightful, you could make your favourite animals, or endangered animals, or animals from specific areas such as Africa, Australia, India or the North Pole.

I'm sure you will have a lot of ideas for making scented stuffed animals, and I bet you have a lot of fun making them too.

Santas Postbag

Xmas Shopping Tips

Wellington Boot Rudolf Decoration

Wellington Boot Rudolf Want to make a Rudolf wellington boot Christmas decoration unlike any other? A smashing festive ornament, who you can help adoring.

To make a welly Rudolf you will need... 4 pairs of kids old wellies. Unless you are best friends with Snowhite and the seven dwarfs, I suggest that you look for wellies at your local car boot. You can pick up kids old wellingtons for around 20p to 75p. Don't be afraid to haggle. Try to pick wellies that don't have a raised image on the side, as this will show up on Rudolf later. I used wellies sized 10, 10, 7 and 3 (UK child sizes) Get what you can but try to get wellies of a similar size.

You will also need...
Thick card (the side of a grocery box is ideal) gold spray paint, string, newspaper, 2 glass stones, a red Christmas bauble, and Evo-Stick timebond adhesive or another glue which will stick rubber.

Firstly, give the wellies a good wash. Glue and paint wont stick properly with dirt in the way.

Arrange Rudolf?s legs.
Use the smallest pair of wellingtons for the forelegs. Stand the boots side by side and make two small holes in both boots on the inside leg part. The holes in the boots need to line up. Apply some glue to stick the boots together and thread some string through the holes to tie the boots together for extra support. Keep the threading and ting of string invisible by doing it on the inside of the boots. It is a bit of a fiddle, but is important.

Use a pair of sized 10 boots for the hind legs. Put the heels together and the toes apart, just wide enough to nestle the forelegs in between. Make holes ready for tying the boots together as you did before and glue the hind legs together at the heel and to the forelegs wherever they touch. Tie the boots securely with string invisibly on the inside.

Leave the welly structure to dry for 24 hours before continuing.

To make Rudolf?s back and tuffty tail, take a sized 10 boot and cut it down the back seam in a straight line. If you use a knife for this part, be very careful not to cut yourself. Cut a triangle wedge from the heel of the boot. This is to remove the stiff rubber that shapes the heel because it is too stiff to work with.

Stick Rudolf's back onto his legs. Open the split that you cut at the back of the boot and slot over the tops of the legs with the toe of the back boot pointing upwards. Bring the top edge of the back boot round to the front legs. Make small holes in these corner flaps and in the front wellies at the tops and stick the back boot into place and thread string into the holes that you made and tie securely. These knots will be on the outside of the structure but will be covered later.

The neck and lower head. With the other sized 10 boot, cut the back seam of the boot again but this time only cut down to the top of the heal shaping. Turn the boot upside down and open the back split, slot the boot over the top of the front legs, with the shaping of the heel resting on Rudolf's back. Glue into place and anchor with parcel tape to hold the position until the glue dries. You may find that it helps to leave Rudolf to dry for 24 hours on his size. Remove the tape once the glue is dry.

Rudolf's head. With a sized 7 welly cut down the front and back seams of the welly to the top of the heel and foot shaping. Cut ear shapes from the two flaps that you have just created.

Cut out two simple but chunky antlers from thick card. Do not put bends in the cardboard structure as you cut the antlers out. Make the antlers wider at the bottom, this help support the antlers later.

Push the antlers into the 'head' boot so that the base of the antler touches the sole of the boot. Scrunch up a sheet of newspaper and push it between the antlers to separate them and to wedge them in.

Make tow small cuts to form an 'X' in the toe of the boot and cut the flaps of the X away for make a circle ready to add the nose later.

Stick the top of Rudolf's head to the rest of the structure and leave to dry. Spray paint the reindeer gold. Read the back of the paint tin and follow the manufacture?s advice of how to use the spray paint. Give the reindeer a coupe of coats of paint and be sure to cover all the nooks and crannies. When the paint is completely dry, pull the end off the Christmas bauble and stick it into place with the bauble stork pushed through the hole in Rudolf?s nose. Finally, stick two glass stones in place for Rudolf?s eyes.

Rudolf can be scaled up to make a garden decoration by using adult wellingtons. Put a brick or stones inside each of Rudolf?s feet to prevent him from falling over or blowing away in the wind. Because the dimensions of adult?s boots are different to children?s boots, a large Rudolf's back legs can be positioned in a similar fashion to the front legs.

Paint and use a small ball for the nose. Half and paint a Ping-Pong ball for his eyes and fashion antlers from Wire coat hangers and bind with tinsel.

Visit here for more images

Christmas shopping tips HERE

How to make an LED Candelabra


This candelabra is a great project combining 21st century crafts with art to produce a stunning, ivy covered tree structure, which is bound to get people talking. It is surprisingly easy to make, but you do need to do some electrical work and may have to do some soldering. The Funky LED candelabra would make a great technology project for school.

All you need to make the candelabra is...
8 wire coat hangers, a circular cake board, 10 LED Lights, card, silver spray paint, and electrical chocolate bock, cable ties, clear baubles, No Nails glue, bendable craft wire, electrical wire, soldering iron and solder (But not in all cases)

Cut and straighten out the coat hangers and re-model them to form 'C' shapes. Use two cable ties to hold the coat hangers together, forming a trunk.

Manipulate the branches to form appealing shapes. The LED lights will be at the tip of each branch, bear this in mind when you are shaping the tree and try to spread the lights evenly about so that the structure looks attractive from every angle.

At the base of the structure, the wire 'legs' are splayed out like the spokes of an umbrella. Make a small 90-degree turn at the end of each 'leg' to create a 'foot' (pointing down)

Each of the 'feet' needs inserting into a hole in the edge of the cake board. Use a hammer and a nail to make holes in the cake board. Tape the nail in a way and wriggle the nail about a bit before pulling it out, to enlarge the hole.

Fill the hole with no nails glue and push a foot into it. Hold it in place with selotape until the glue dries. Insert all of the wire feet into he cake board in this way.

Leave until the glue is completely dry and then remove all the pieces of selotape.

Using craft wire, make interesting twisty bits to decorate the candelabra’s branches. To make 'springs', wrap a length of wire around a pencil. To fix the wire in place, anchor it down by wrapping the end of the wire around the coat hangers forming the trunk. The wrapping around the trunk adds to the support of the structure when the cable ties are taken away.

Option 1 - There are a couple of options with the lights themselves. The '99p Store' sell 20 mini battery operated LED lights. You could use these lights as they are and have lights along the branches wherever the bulbs happen to be.

Option 2 - You could use these electrical parts from the 99p store lights to keep the costs down. This would also mean that you wouldn't need to solder, you could just twist wires together and wrap in insulation tape.

Option 3 - You could buy LED lights, resistor and a battery compartment separately, and solder the components together.

For the latter two options, you will need to apply 2 electrical wires for each bulb to the candelabra. The battery compartment will be hidden under the trunk of the tree. Leave 5cm surplus wire here for connecting to the battery compartment later. Twist the wire up and around the trunk and along the branches keeping your wires in pairs. This wire should create the effect of ivy growing up the structure. Again leave 5cm of wire at the end of the branch for connecting the LED light.

8 of the LED lights will be situated at the ends of each ranch and the remaining two should be nestled from where the branches sprout.

Attach an LED bulb to each of the pairs of wires. You can solder the connections or twist them together if you have dismantled LED lights from the '99p Store'. If you twist the wires together you will need to wrap the join in insulation tape.

Use a small amount of tape to stick each bulb into place o the wire structure.

Mask each bulb with newspaper and selotape and spray paint the structure with silver spray paint. Also spray the out side of the battery compartment. Use the spray paint in accordance with the instructions on the back of the tin. You may need to give your tree 2 coats of paint for a really good Finnish. Leave until completely dry and remove masking from the bulbs.

Pull the plastic hanging devices off each bauble, leaving a hole or a tunnel going into the baubles. Use a small amount of clear drying glue to stick each LED light inside the hole of the baubles.

To wire up the 10 LED lights to the battery compartment you need to put new working batteries into the battery compartment. LED lights will only wire up one way so you need to find out which wires go where from the pairs of wires at the base of the tree.

Strip a small portion of its plastic covering, from the two wires on the battery compartment, as if you were getting ready to join the wires. Mark one of the wires with a small piece of electrical tape.

Go through each pair of wires at the bottom of the candelabra in turn; stripping away and amount of plastic sheath and holding the bare wires against the two wires connected to the battery compartment. If a bulb doesn't come on, swap the wires over.

When the bulb comes on, mark the wire that joins to the wire marked with electrical tape. Eventually you will end up with 10 marked pieces of wire and 10 unmarked pieces of wire.

Take the marked ends of wire and twist them together in groups of 3 or 4 ends, and push the 3 groups into the first 3 spaces of an electrical chocolate block. Screw them in. Do a similar thing with the unmarked wires, pushing them into spaces 4,5 and 6 on the chocolate block on the same side as the marked wires. Screw them all in firmly.

Next cut two 4 cm pieces of wire, and strip both ends. Twist one end together with the marked wire from the battery compartment, and twist the other one to join the end of the first one. This gives you 3 twists of wire from the marked wire from the battery compartment. Push these three twists of wire into the chocolate block to join the marked wires from the structure, in spaces 1, 2 and 3. Repeat this procedure for the unmarked wires, pushing the twists into spaces 4, 5 and 6 to join the other unmarked wires. All the lights should now work.

Use glue to stick the battery compartment and the chocolate block to the cake board, directly under the trunk of the structure.

Cut out assorted sizes of ivy leaves from thin card. You will need 20 or 30 leaves in all. Use a needle to make a hole in each leaf where the stalk would be. Spray paint both sides of the ivy leaves silver and leave to dry.

Attack the leaves to the structure by threading the leaves individually on a short piece of craft wire, then bend the wire around the network of wires on the tree and twist the craft wire ends together to secure the leaf. Use the largest leaves at the bottom, gradually getting smaller further up the candelabra. Also, make sure that the bottom most leaves hide the battery compartment and chocolate block.

There you have made a stunning candelabra, which is bound to be a talking point wherever you place it.

For more images click
HERE

Chistmas Shopping

Wednesday, October 18, 2006

Operation Christmas Child

We all know that Christmas is a time for giving. God gave us his son to save us, the three wise men gave gifts to the baby Jesus at the nativity scene. Santa Claus does his famous mad dash on Christmas Eve giving out gifts and we all enjoy giving and receiving gifts from our friends and families.

The act of giving and receiving is important and makes us feel happy. It brings joy to the people who we care most about. This is a very special thing and it makes us feel special.

Of course there are many children around the world who are less fortunate. They might be very poor, or sick in hospitals, or in orphanages, refugee camps, and homeless shelters and in impoverished neighbourhoods in poor countries. The children will not feel that special tingle of excitement from receiving a special Christmas gift that was bought just for them.

With the help from families, schools, churches, business, youth groups, clubs and you, operation Christmas child can bring not only Christmas, but love, hope, warmth to children who find themselves in desperate situations this Christmas time.
All you need to do is...
Cover a shoebox in some Christmas wrapping paper and fill it with gifts. Toys, a toothbrush, soap, a hat and scarf, a teddy, a small ball, colouring books and crayons, jigsaw puzzles, cars, planes, sweeties and other things that all children like. You will also need to donate ?2 towards delivering the gift stuffed shoebox to a child. Details of gifts to send, and how and where to send your filled shoebox can be found Here

Maybe you could get your school involved in filling shoeboxes, or the club that you attend. Get your Grandma knitting mittens, get your Dad's work involved, and get your Mum wrapping up shoeboxes.

Your generosity could make a child feel that same warm tingle of excitement that you feel when you?re ripping into your Christmas presents on Christmas morning.

Do something special for someone you don't know this Christmas. Keep the magic of giving alive and fill a shoebox, and make a difference to someone else's Christmas.

Santas Postbag.co.uk Keeping Christmas Magical

Tuesday, October 17, 2006

Stained Glass Effect Christmas Paper Lantern

Make a beautiful stained glass effect Christmas Lantern, a beautiful Christmas decoration for any room. Made from a paper lampshade which will fit and ceiling light. When the light is switched on you see the full effect of the stained glass effect.

To make the stained glass effect paper lantern you will need... A ball shaped paper lamp shade/lantern in any size you wish. Felt tip pens, black paint. You need to create a design for the lantern. Draw the design on a sheet of paper. You could draw the nativity scene, a Christmas tree, Santa Claus or maybe 'Merry Christmas'. The design needs to be simple and bold.

Once you are happy with the design you can start work on the lantern itself. First you will need to erect the paper lantern. It should have assembly instructions with it. Unfold the lantern and insert a wire expander inside the lantern, this slots into place and keeps the lantern erect and taught.

Take a black felt tip pen or a marker and draw the design on to the paper lantern. Be careful when you are doing this because the lantern is made of paper and the wet ink makes the paper fragile. If your pen does accidentally 'go through' stick a small piece of paper on the hole to patch it up and leave it to dry.

Once your design is complete, paint the background of the lantern black. This is so that the lantern blocks out some of the light. Again you need to take care not to puncture the paper. Use two brushes to paint the lantern, a thin brush for small and detailed areas, and a thick brush for large areas.

Top Tip - Paint from the top of the lantern to half way down, and leave to dry. Then turn upside down and paint the other half. Use a dish to stand the lantern on, it stops it from moving and raises it up from the work surface.

For best results, give the lantern two coats of black paint.

Once the paintwork is dry, you're ready to apply the stained glass effect. With coloured felt tip pens, colour in the white areas of your design on the paper lantern. Again take care.

Now hang the lantern up from a ceiling light in your home. Every time the light is turned on your delightful design will glow like a stained glass window in a church on a sunny day. The lantern is a fun and unusual Christmas decoration.

Do not use a higher wattage bulb in the lantern than indicated with the lantern instructions and packaging.


More Christmas trimming ideas Here

BigBoysToyz.com The christmas Toy Shop

Cinderella Slipper Jewellery Box

Cinderella is a popular Christmas pantomime. It's a heart-warming tale where the handsome prince whisks the girl off her feet and saves her from her evil stepmother and the ugly sisters. There's a lot of fun with Buttons and all the 'He's behind you' traditions of a Christmas panto.

Cinderella of course looses her Glass Slipper, which is how her handsome prince eventually finds her. Every would-be princess should have one of these cute Cinderella slipper jewellery boxes, however this one is made from card and plastic not glass.

All you will need is...
Thin card, A clear round plastic bottle, paint, glue, pegs, Selotape and fur fabric. Don't forget to print out the pattern for the pieces. Follow the link at the bottom for the pattern peices.


Cut out the pattern pieces

To begin, the main part of the slippers needs to be cut out. Fold the piece of card in half and draw around the pattern piece with the 'toe' of the pattern on the fold of the card so that the main piece turns out to be a long symmetrical piece. Join this piece in a loop with some selotape at the heel. Curve the toe and heel as necessary to form a shoe shape. Curve the toe end and cut out a slipper sole from card using the pattern and score the fold marks. Now fold them. These folds allow the sole to fit around the shaping of the main part.

Put the sole in place on the bottom of the slipper and hold it in place with some selotape.

Cover the outside of the slipper with one layer of paper mache, to give the slipper a nice surface to paint. Once the paper mache is dry, paint the slipper in the desired colour.

Cut out a second main part, but this time put the heel on the fold. Cut out this piece to be slightly smaller all around.

Stick this main part onto a piece of fur fabric which is 1cm larger than the card all round, except at the heel shaping. Put some glue on the over hanging fabric and bend it over the card and stick it on the other side of the card. Use pegs to hold it in place until the glue dries.

Cut out a second card sole (again cut out this piece to be slightly smaller all around) and cover one side of it in fur fabric as you did for the main part. When the glue is dry remove all the pegs. Glue the fur sole inside the slipper at the bottom. Then curve the fur main around and glue it in place inside the slipper.

To make the top of Cinderella's slipper cut out a top piece in card and paint one side the same colour as the base. Cut out two more slightly smaller top pieces. Cover one with fur fabric as you did with the other slipper parts and leave it to dry.

Cut the top and bottom of a clear round fizzy drinks bottle and cut up the middle so that the bottle opens out flat. Wash and dry the bottle. Selotape the slipper upper to the plastic and cut it out.

Glue the marked part (Sticking Edge) of the slipper upper so that it curves round and sticks to the underside of the painted top. Use bits of Selotape to hold the plastic in place until the glue dries. Stick the third top piece over the selotape and bottle bits. Hold in place with pegs.

Finally, stick the fur-covered top on the underside of the top piece with the plastic. This is now the lid to the Cinderella jewellery box.

You could make the slipper all from card and cover it in red glitter to make a ruby slipper from the Wizard of Oz.

Click Here for the Pattern Pieces

Christmas Shopping Ideas at Big Boys Toyz

Monday, October 16, 2006

How to Make a Nutcracker Prince Christmas Tree Decorations

The story of the Nutcracker Prince is an enchanting Christmas classic written by E.T.A Hoffman. It's a story of adventure, romance and bravery.

The story is about a young girl called Clara, who dreams of becoming a ballerina. Her uncle gives her a small nutcracker doll. He told her the tail of the doll and how he had once been a real boy, but the wicked mouse queen had transformed him into a Nutcracker - Prince of the dolls. During the night all Clara's dolls come to life and she finds herself in the middle of an adventure and a war between her toys and the Mouse King. Read the book or watch the film of the Nutcracker Prince, and see what happens.

To make the Nutcracker Prince and Clara you will need...
Two dolly pegs, felt tip pens, paint, PVA glue, black card and a small amount of ribbon and lace.

To make the Nutcracker price doll, paint the main body red but leave a triangle at the top to look like he's wearing a jacket. Paint the tips of the peg black to represent his shoes. Paint the head of the peg with short hair.

Draw on the Nutcrackers face with felt tip pens once the paint is dry. And give him some buttons.

To make his hat cut a long thin strip of black card and roll it up tight to make a solid cylinder. Glue the end down. Cut out a 'D' shape of black card to make a peak for the hat. Stick the 'D' on the nutcracker’s head, and stick the roll of card on top of that and leave to one side to dry.

To make Clara the ballerina, paint the body of the peg the colour of Clara's ballerina dress. Paint the tips of the peg the colour of Clara's ballerina shoes and add some 'X' up the peg legs for the ballet shoe ribbons. Paint some brown hair on the peg head and draw on a face with felt tip pens when the paint is dry.

Use a piece of ribbon or lace to Finnish the ballerina dress. You will need the ribbon or lace to be the same length as the peg. Sew a row of small running stitches up one of the long edges. Draw up the thread so that the fabric ruffles to form a skirt. Wrap it around the peg and tack the two ends of fabric together. Hold the skirt in place on the peg with a small amount of glue.

Peg the decorations on the branches of the Christmas tree. But be careful, they might come to life in the middle of the night!


SantasPostbag.co.uk FREE personalised emails from Santa to your child

Christmas Shopping

Home Made Advent Calendars

Advent calendars are brilliant for counting down the days to Christmas. Every morning you have the fun of finding the next door and seeing what's hiding behind it. Chocolate calendars are very nice with a chocolate treat behind each door. You could make your own calendar. The best thing about making your own calendar is that you can put your favourite thing behind each door, or perhaps you could put the gifts you are most wanting Santa to bring you behind each door.

All you need is...
Felt tip pens, paints or pencils, PVA glue, thin card or stiff paper, magazines and catalogues and two print outs of a calendar front and a calendar back.

Calendar Print Outs
Print out one back for each Calendar and one front, choose from a Santa Calendar or a Rudolf one.

Click here for the Calendar Print outs

Take the 'back' print out, it is covered in 25 squares. Each square corresponds with a door on the front print out. Cut out pictures from the magazines and catalogues and stick them onto the squares. Don't worry if the pictures hang out of the boxes a little, it wont bee seen later. Leave this to one side to dry.

There is a choice of two print outs for the calendar front. There is a Santa calendar and a Rudolf one. Print one out and colour or paint the picture on the front of the calendar. If you choose to paint it, you will need to let it dry out before you continue.

The front of the calendar needs to be stuck to thin card or stiff paper. Sugar paper would be ideal. Cover the whole of the sheet in a thin layer of PVA glue, and stick on to the card or paper. Allow to dry.

Each door on the front of the calendar needs cutting. You need to be very careful, and cut 3 sides of each square. The doors could open to the left or to the right, or upwards or downwards, whatever way you choose.

To cut the doors is a bit tricky and younger children may need an adults help.

Put a ball of plasticine or Blu-Tack on the table, and place your picture on top of it where you want to make the hole, at a corner of a square would be good. Push a pencil through the paper and into the Blu-Tack or plasticine. This will give you a hole to get the scissors into to cut the door. Cut around all 25 doors.

Stick the calendar front to the back (The sheet with the magazine pictures stuck to it) Making sure that you can see the pictures when the doors are opened.

Leave the calendar somewhere to dry.

On the first of December you an open the first door of the advent calendar, the door with number one on it. Open one door every day. The morning that you open door number 25 will be Christmas Day, when we celebrate the birth of Jesus Christ.

Christmas Shopping

How to make a Christingle Orange

What do you know about the Christingle?

Christingle Orange
Christingle means 'Christ-Light'. The Christingle celebrates the light of Christ and puts Christ back into Christmas. The first Christingle service was in Germany around 1747. The service encouraged children to keep a candle burning in the window of their home so that people who passed by would see the light of Christ.

The Christingle service teaches children about Jesus. Of course Christmas celebrates the birth of Jesus, but the Christingle celebrates the meaning of Jesus' life, with each part of the Christingle orange having it's own symbolic meaning.

The orange itself represents the world.
The red ribbon around the orange symbolises the blood of Christ that Jesus shed to save us from our sin.
The four cocktail sticks are the four seasons of the year.
The dried fruit or sweets represent the fruits of the earth and the earth's riches God has blessed the world with.
The white candle, which is place in the top of the orange, represents Jesus, the light of the world that shines over everything.

The Christingle service usually takes place on the last Sunday before Christmas or on Christmas Eve. You could contact your local church for more details about visiting the Christingle service.

Of course you don't have to go to church, you could make your own Christingle range.

All you need is...
An orange, 4 cocktail sticks, red ribbon, dried fruit or small soft sweets such as jellies pins and a white candle.

Cut a hole in the top of the orange so that the candle will sit snugly in place.

Wrap a length of red ribbon around the middle of the orange. Hold the ribbon in place with pins, push the pins into the orange.

Carefully push dried fruit or soft sweets onto each cocktail stick, so that the cocktail stick is half covered Carefully push the cocktail stick into the orange above the red ribbon. Evenly space the cocktail sticks out to the Four Corners of the world.

Finally add the white candle to the top of the orange. Light the candle and leave it in a window for passers by to see the light of Christ. Do be careful not to burn the curtains, do not leave the candle unattended. Remember to enjoy the fruits of the earth.

SantasPostbag.co.uk get free emails from Santa Claus

Christmas Stockings for Stocking Fillers

Stockings and stocking fillers are an old Christmas tradition. When Santa Claus went down some chimneys, occasionally small gifts fell out of his sack and landed inside people’s socks and stockings that were hanging around the fireplace to dry over night. The owners of the stockings and socks were happily surprised on Christmas morning to find their stockings filled with 'stocking fillers'.

Nowadays, stockings are a firm feature of Christmas however, we do tend to hang out our stockings more expectantly rather then to appreciate a welcome accident.

To make a mini Christmas stocking you will need...
Assorted coloured pieces of felt, coloured thread, ribbon, glue and a print out pattern

Click Here for free printable pattern

Cut out the pattern piece.

Place the stocking pattern piece onto a piece of felt. Put the pattern close to the edge of the felt to save fabric. Cut right up to the pattern piece, there is no need for a seam allowance. Two main stocking parts are needed for each stocking. These can either be the same or different colours.

Pin the two pieces together and working on the right side, work blanket stitch around the edge of the stocking to sew he two parts together.

Tack a loop of ribbon inside the top of the stocking at the back. This is the loop for hanging the stocking up.

Decorate the front of the stocking with holly leaves and berries cut from scraps of felt. Stick them into place with PVA glue.

You could personalise the stockings by embroidering a name or initials on it.

Sequins make attractive decorations. Sequins look really festive near the Christmas tree, reflecting the light from the fairy lights.

Another simple decorative idea is to cut away shapes in one side of the stocking before blanket stitching them together. This Lacey effect is pretty and shows off a little of the stocking filler inside.
These little stockings are ideal for small gifts, such as sweets, chocolates, money, nail varnish, broaches, and other little trinkets. Hang them on the fireplace or on the Christmas tree.

Find stocking fillers at
BigBoysToyz.com an online toy shop

Wednesday, October 11, 2006

Blown Egg Christmas Baubles

This is a cracking Christmas decoration idea. I just know your going to get eggsited by this one. Okay, Less of the foul yokes! But seriously eggs make wonderful Christmas tree baubles.

I don?t think that there is anything more festive than making your own Christmas baubles to hang on the Christmas tree whilst listening to Christmas carols, it really makes you feel the spirit of Christmas. Why not make Christmas tree baubles from eggshells? Everyone thinks of eggs at Easter time, but they symbolise new beginnings, like the birth of Jesus Christ.

All you need is...
Some eggs, gift-wrap, ribbon, paint, some wire, glitter and other odds and ends for decoration.

First take your egg in one hand and a darning needle in the other. Hold the egg firmly in your hand and push the needle into the centre of the wide bit, at the bottom of the egg. Once the needle is through, wiggle the needle about a bit to make the whole a bit bigger. Now turn the egg around and make another hole in the top of the egg, again wiggle the needle.

Then with a dish underneath to catch the insides of the egg, blow very hard into one end of the egg, and blow the egg out. DO NOT SUCK! This is very bad.

There are concerns that you can contract salmonella from raw eggs. If you are worried about this you could use a medicine syringe to force air through the eggshell.

Remember not to let the egg go to waste. Make scrabbled egg for your dog or use them to bake some cakes.

Once the eggshell is empty give it a good wash out with disinfectant and leave it to dry overnight. Stand it in an eggcup so any excess water can run out freely.

Give your eggshell a coat of paint. Metallic is nice and festive. Leave the paint to dry.

You need to make an egg threader with a piece of wire, which is about twice the length of the egg. Turn the end over and down to form an 'eye' like you would find on a needle. Wrap some selotape around the turn down bit of wire and the main stem of wire.

Get a length of gift-wrap ribbon, which is roughly 4 or 5 times as long as the egg. Fold it in half and tie a knot in the ribbon about 2cm down, forming the loop for hanging the egg on the Christmas tree.

Insert the threader tool into the tool at the top of the egg and out through the bottom of the egg leaving the eye resting on the top of the egg. Tread the two ends of the ribbon through the eye of the egg threader tool. Gently pull the threader tool and the ribbon through the egg, so that the loop knot you made rests on the top of the egg, and the gift-wrap ribbon dangles out from the bottom of the egg. Tie a knot in these ribbons so that the knot sits at the base of the egg. Tie another length of ribbon to these ribbons at the knot. Pull all the ribbons over a pencil to make the ribbons curl.

Stick a small image from a Christmas card or gift wrapping paper on the side of the egg or create a motif with sequins or other bits and bobs.

Finally, using PVA glue, stick some glitter on to the egg to make it sparkle.

Treat the egg bauble like a glass bauble, pack it away carefully and use it every year. If you don't want to use eggs, try Ping-Pong balls instead.

View the Egg baubles Here

Gift Ideas

Decorative Candle Holders

Beautiful and functional candleholders made from flour and salt dough. Cheap and easy to make and look rather effective.

You will need...
4oz (100g) Plain Flour
3oz (75g) Salt
Hot Water
Paints
Spray varnish or clear lacquer

Begin by dissolving the salt in a small amount of hot water. Add the flour and mix to form dough. Add cold water if necessary but don't make the dough too sticky.

Now you?re ready to model your candleholders. It's helpful if you have a candle handy to gage the size of the candleholder needed.

You need to start off with a base. Roll out some of the dough with a rolling pin. Use a cutter or a glass to cut out a circle from the dough. This is the base of the candleholder.

Roll two long sausages that are long enough to reach around the edge of the base. Twist the sausages together to create a nice rope effect. Fix the twisted strip around the base with a little cold water for glue. Add decorations to your candle stick base...

Holly is attractive and gives the candleholder a festive flavour. Roll out an amount of dough with a rolling pin and using a knife cut out a prickly holly leaf. Use the knife to press on some leaf veins. With a dab of water, stick the leaf draping over the twist edging. Roll three small balls of dough for berries and stick them at the base of the leaf.

Rose Candleholder...
Cut two leaves, press in some leaf veins and stick the leaves on the twisted edge so that they over hang. Roll six small balls of dough and squash them to make circles. Pinch the bottom of one of the petals so that it almost folds in half. Wrap another petal around the first pinching the bottom and gently moulding the petal so that it curves out. Add the other petals in this way, pinching the bottom. Allow each petal to slightly overlap the previous one. With a dab of water stick the rose between the leaves on the candleholder.

Mousie Brown wasn't keen on tall candlesticks but he loved our cute little candleholders. To make a mouse roll out a long, thin sausage of dough, make it taper at one end. Stick this to the edging of the candleholder so that it curls like a mouse's tail. Roll a small mouse sized ball of dough, pinch out a pointed nose. Stick the mouse body to the candleholder on top of the wide part of the mouse's tail. Roll two small balls and squash them flat. Pinch the bottom of each ear slightly to give the ear some shape, and stick them to the mouse's head. Roll two tiny balls for his eyes.

Feeling confident? Try making a fancy, more traditional looking candleholder. Roll out some dough and cut out a larger base than before. Create a wavy edge tot he base - Put two fingers on the far edge of the base a fingers width apart. With the other hand, drag your index finger towards you between the two fingers of the other hand, making the dough ruckel up. Do this around the edge of the base but leaving a space with no shaping.

Roll out a chunky sausage and make a dough nut shape to hold the candle. Stick the doughnut on to the middle of the shaped base. Roll out another chunky sausage to make a handle. Stick one end to the doughnut shape (at the point where there is no shaping in the base) and curl it round so that it almost forms an 'S' shape, stick the other end on the base.

Once you have moulded your candleholders put them in the oven on a low heat for two hours. The are in the oven to dry out, not to bake so keep the heat low.

When they come out of the oven, leave them for a couple of days to dry out completely. Then paint, spray varnish, and insert a candle.

Write a letter to Santa Claus telling him what you would like this Christmas Here

Get your Chrsitmas shopping at BigBoysToyz

Peg Art Teapot Stand


This is an ideal Christmas pressie for Granny or any great tea lover. This peg teapot stand is practical, beautiful and so easy to make. It?s a work of Art!

All you need to make a teapot stand is pegs and No Nails Glue. You can varnish your finished teapot stand but you would need to use a marine varnish because normal varnish will spoil if on contact with water, with water being an essential ingredient of the tea making process. An accident is very probable.

You will need approximately 23 wooden spring pegs. You may need a couple more or less because the peg sizes may vary.

First dismantle all the pegs. Remove and discard the metal spring, you just need the two pieces of wood.

You will notice on the shaped side of the peg that one end tapers and becomes slim. This is the area to apply the No Nails Glue from the tip to the indentation of where the spring once was.

Glue the peg halves together in groups of four so that all the shaped surfaces face the same way.

Allow these clusters to dry overnight. Trying to make the teapot stand in one go makes it fiddly and frustrating because you apply pressure to make the pegs stick, but the other pegs slide out of position. More haste, less speed!

The following day join the clusters of four peg halves together to form clusters of eight. The following day join the clusters of eight to form clusters of sixteen and so on until the peg halves form a star like circle, with a hole in the centre. You may need to add additional peg halves to achieve this.

Allow the glue to dry completely before you continue.

Use sandpaper to stand the two flat surfaces to the teapot stand to smooth, clean and remove any excess glue. Now you can apply a couple of coats of marine varnish if you choose to. Read the varnish tin for directions of how to use the varnish.

An interesting artistic looking teapot stand that would give any teapot that wow factor.

More tea pot stand images Here

Christmas Shopping

How to Make a Jingle Bells Instrument to Accompany Christmas Carols

Fun to make and a great accompaniment to the classic carol Jingle Bells, just shake to the beat. Who would have thought that rubbish and junk could sound so festive?

Al you need to make a jingle bells musical instrument is...
16 metal bottle caps, paint, brass nails, sandpaper, hammer and some scraps of wood.

First paint the out side of the bottle caps a nice metallic colour. Spray paint is quick and easy, but applying paint with a brush is just as good.

When the paint is dry, use a large nail and hammer to make a hole in the centre of each cap. Have the cap sitting face up as it would do on the bottle, that way the rough edges are created on the inside of the 'bell'.

The bells are fixed to a piece of wood, roughly 2cm by 3cm and 28cm long. Give the wood a good sanding so that it doesn't have any rough surfaces. You could paint or varnish the 'handle' if you wish to. Working on one side of the handle at a time, attach the capes in pairs with the insides of the caps facing one another. Push a brass nail in the holes of the caps and offer it up to the wood.

Place the first set of bells 5cm away from the end. Don't hammer the nail in too far into the wood. The bells need to move freely on the nail and clatter together.

The second set should be 8.5cm away from the end.

The third set should be 12cm away from the end.

Now turn the handle over to attach bells to the other side. Use scraps of wood to prop up each end of the handle so that it is clear off the workbench. Otherwise you will spoil the bells that you have already attached.

Add bells in pairs in the same way as you did on the other side, but this time the first set of bells 1.5cm away from the end. Add the other sets of bells so that they are level with the bells on the other side of the handle.

Then turn the handle over to attach the remaining set of bells. Again use scraps of wood to prop up the handle.

And there you have it, a set of jingle bells. Young children should be supervised when playing the jingle bells.

If you find it difficult to obtain bottle caps, you could ask an adult to approach a public house or bar, they have no use of the caps. You could also maybe write to a local brewery requesting some bottle caps. Alternatively look in the winemaking department of Boots or Wilkinsons for new bottle caps.

More fun Christmas Stuff to make Here

Christmas Shopping

Wednesday, October 04, 2006

Posh Hat Needle Case and Thimble Holder


This is a lovely gift for anyone who loves sewing or needlework. The base of the hat is like a book for storing needles and the top of the hat stores the all-important thimble, so you always know where it is. This needle case is rather fiddle to make, so take your time.

You will need? Some pieces of felt, embroidery thread, and a print out of the pattern pieces.

Click here for a printable Pattern

Cut out the pattern pieces from the printed out sheet. Place the pattern pieces on o the felt and pin into place. Put the pieces around the edge of the felt and close up next to each other because this saves fabric. Cut around the pattern pieces, there is no need to leave a seam allowance, cut right up to the patter.

Each pattern piece says on it what part of the hat it is and how many you need to cut.

Use embroidery thread to sew your hat together. Embroidery thread is usually made up of six strands. Split the thread so that you only use three strands to sew with.

Get the two top hat pieces and prepare to sew the circle to the top edge of the shaped top hat piece. Use blanket stitch to sew the hat together. Curl the shaped piece around to follow the circle piece. You may find that the two ends of the shaped piece overlap at the end. Trim the ends so that they meet nicely and over sew them together.

The top part of the hat now needs to be sewn to the brim of the hat. The top part sits over the hole in the hat brim. The blanket stitch will show on the inside here.

The two inner discs need to be sandwiched between the top part of the hat and the base of the hat. The inner discs are slightly smaller and need to be placed off centre so that the edge touches the back of the needle case; this will be the hinged area.

Attach the threat to the left-had side of the hinged area and blanket stitch 3cm through all four layers.

After the hinged area, keep the thread attached to the hat. Edge the brim of the hat with blanket stitch.

Re-join the thread to the base of the hat at the left-hand side of the hinged area and edge the base with blanket stitch.

Cut out some flower shapes in contrasting felt. Tack the flowers to the hat with a couple of stitches, to finish off the hat.


For more christmas gift ideas to make visit SantasPostbag

Tuesday, October 03, 2006

How to Make Paper Mache Christmas Dishes

Paper mache has been used for many years to create decorative objects. The Victorians would make paper mache boxes and dishes to sit on their dressing tables for jewellery and other trinkets. Paper mache is quick, cheap and easy to use and creates sturdy objects. Of course these objects can not be washed because they are just made from newspapers.

To make a delightful paper mache Christmas dish all you need is?
Old newspapers, PVA glue, paints, scarps of Christmas wrapping paper, varnish and Vaseline.

How to do it?
Fist you need to find a nice dish or plate to use as a mould. Be warned, a large dish or plate will take longer to make. It may be a good idea to start off smaller. Saucer sized is great for a starter mould.

Sometimes the underside of the dish or plate can have a more interesting shape than the top surface. Bear this in mind when choosing a mould.

Cover the surface that you want to use as a mould in Vaseline. This prevents you from simply sticking the newspaper to the plate. It will make it easier to lift the paper mache from the mould at a later date.

Mix some PVA glue with water. One part glue to two parts water. Rip up small pieces of newspaper and dunk them into the glue mix, and apply them to the mould so that they overlap. Cover the entire mould surface, allowing the newspaper to over hang the mould, any excess can be trimmed off later. After the initial layer you can use a rush to paste the newspaper on, it?s a lot less messy.

After completing three layers of newspaper allow the paper mache to dry over night. In total the dish needs a minimum of about ten layers to complete this stage, again allow to dry over night.

Before you remove the paper mache from the mould, use the mould as a guide and rim a neat edge around your pot, cutting away the surplus over hanging paper.

Then you?re ready to prize the paper mache from the mould. It can help to run a knife between the paper mache and the mould. Be careful and don?t rush.

You may be able to feel a trace of Vaseline on the paper mache, this will spoil any attempts to paint the pot. To remedy this apply one layer of paper mache to the surface of the pot that was exposed tot he Vaseline.

Tidy the edges of the pot by sticking small rectangles of paper to over hang the edge of the pot and stick them down on the reverse side.

Now you?re ready to decorate the sweet or trinket dish. Here are a few suggestions?

Paint it a base colour and decorate the edges with drawn lines or draw some sprigs of holly. Find a centre piece image to stick at the centre of the pot from old Christmas cards or gift wrapping paper.

With gift-wrapping paper rip up small pieces and it apply it to your pot as if you were adding a layer of paper mache. Add a line of glue around the edge of the pot and apply glitter to make it really festive and sparkly.

Of course the pot doesn?t have to have a Christmas them. You could paint it and stick pressed flowers or leaves onto it.

Paint the pot a base colour and then ad blobs of paint to swirl around the pot to create an abstract design.

You could personalise your pot by writing on it ?For Gran? or ?Special Mum?

Let your design dry over night.

Once you have decorated your pot, in whatever style you choose, It will need protecting. Apply a thin layer of clear varnish to the pot. It will need varnishing on both sides, and will probably require 2 coats. You can get quick drying varnish that saves time, you can also get spray varnish which wont smudge a painted design.

And there you are a beautiful little dish for sweets or jewellery. A cost effective Christmas gift idea.

More Chrsitmas makes Here

Write to Santa Here